By Ryan Campbell
A common request in Wufoo is to send a user to a form with some of the data already filled in. Whether it’s a unique ID representing the user or their email and mailing address, anything that saves time and confusion increases the chance that a form gets filled out. Another use for this sort of functionality is to track a user. We recently found ourselves wanting to track what users were doing before they emailed support. Our goal was to find out if our new documentation was working and, more importantly, if users were even reaching the docs before they decided to contact us. It turns out that we were able to create all of the functionality we needed using Wufoo alone, so we would like to share our implementation process with you.
See it in Action
Before we go on and explain all of the small details, let’s take a look at the result this article produces. In order to understand the result, we need to go over a quick background. In Wufoo, there are two ways to contact support: a feedback form and a support request form. The feedback form is for sales questions, product feedback and general information. The support request form is for bugs or complications encountered when using the program. We designed support to make it easy to contact us, but we still want people to look at the documentation because we believe we have made the docs quick and helpful.
That said, we still didn’t want to force users with general questions to go through the documentation, so we have two links in every footer. To see if this approach was working, we started tracking which page people were viewing when they decided to use the feedback form. We know people are viewing our documentation when they use the support request form and ideally we would like people to be on our home page or marketing material when using the feedback form. Using only Wufoo forms and reports, we gathered these results.
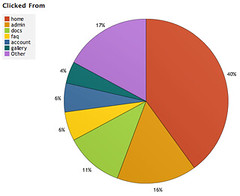
Given this information, we can see that the feedback form is working as intended for the most part. There is still a decent amount of feedback coming from within the Wufoo admin interface that we would like to convert over to the support request form, but more than 80% of feedback seems to be submitted properly.
Implementation
While a tracking system seems quite complex, there are only a handful of steps needed to recreate what we’ve done:
- Create a Wufoo form.
- Populate the default values.
- Hide the tracking fields.
- Create a Wufoo report.
And of those steps, the only one that requires basic programming or work on your end is to populate the default values. You will have to supply the information that needs to be pre-filled in the form.
Creating a Wufoo Form
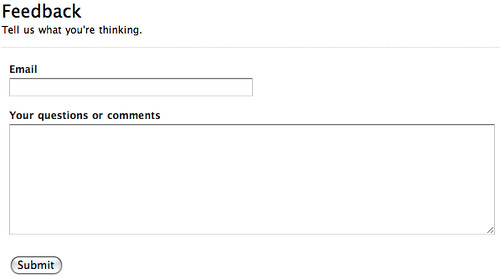
For this step, we’ll create a form inside of Wufoo. The one thing to make sure of is that a field is created to hold the tracking data. In the case of the example above, this will be a single line text to hold a word describing where the user came from. Later on we will hide this field, but for now it will be visible to everyone and the resulting form will appear similar to the one below.

Populate the Default Values
Now that we have a form, we will want to populate it with default values before the user begins filling it out. This is controlled through the URL of the form. The link that the user clicks on to go to the form will have the data in it, so that when the form loads the data can be placed in the fields. We have full documentation on URL modifications that we can reference (the URL explains how to find the ID for each field), but for the example form we’re using, the format would be:
http://username.wufoo.com/forms/form-name/def/field2=home
Make sure that username is replaced with your Wufoo username and form-name is replaced with the name of the form. When the form loads, we will see the data already populated in the last field.

For those of you interested in more technical information, we wanted to show you the code snippet we use to determine what page the user was viewing before they clicked on the Feedback form. The URL above shows the word “home” hard coded, but we want to make this dynamic. To do this, we parse the URL that they are currently on with a little PHP script:
$url = "http://" . $_SERVER['HTTP_HOST'] . $_SERVER['REQUEST_URI'];
$splits = explode('/', $url);
$category = 'home';
if($splits[3]) $category = $splits[3];>
We grab the URL, and we strip out the directory. For example, http://wufoo.com/gallery/ would place the word “gallery” into the form.
Hide the Tracking Fields
Since the data is laced into the field without the need for the user to type it in, there is no need for the user to see the field at all. Back in November, we added the ability to attach custom CSS class names to any field in a form. Using that feature, we’re going to attach the name of “hide” to the tracking field. In Wufoo, edit your form and the click on the field to bring up the field settings. Locate the setting that says Advanced CSS Layout Options, and type the word “hide” in there (without the double quotes). Save your form, and then go view the live version. The field should no longer be visible.
Create a Report
As people begin to fill out our form, we can analyze the data in a few ways. The easiest way is to click on Reports, and create a report with a pie chart. When we add a graph to the report, we use the tracking field as the field to graph, and then we can get a quick overview of the pages people were viewing prior to using the Feedback form.
The nice part of the default values feature is that it can be used in many ways. Creating a report is the easiest way to view your data, but there are definitely more powerful ways. For example, some of our users send a customer ID into their form. Then, on their own web site, they query their data by searching for the customer ID in the Query API. This allows them to then present the data back to the users on their own web site. But most importantly, it was a relief to find out that we could track custom data so easily.